Showing posts with label photoshop tips. Show all posts

Tuesday, August 18, 2009

Photoshop Brushes, etc.

or, the extended title: Photoshop brushes/Keeping my Sanity/Bragging Rights/Things I Love/Mama Memories/Ian's Alphabet

1. Photoshop brushes
Wish I played more with brushes. Here, I played a little with some pictures from yesterday.


2. Keeping my Sanity
To my book club ladies:

Tonight.
So fun. So good to laugh. So not snooty. So much a favorite thing I do each month.
We should be a panel on Crossfire, what with all of our extremely different political views. But instead, we're a group of ladies who love and respect one another and appreciate our differences. Carol: thank you for putting such a wonderful group of ladies, now friends, together almost two (has it been 2 yet?) years ago.

3. Bragging rights
Check out this site Nathan designed and developed. Incredible!!! Went live tonight.

4. and 5. Things I love/Mama Memories:
  • Coming home to a sweet honey who has the children in bed. Asleep.
  • Going in to kiss my sweet Ian on the cheek. Love that last little sugar of the night. Such a warm, sweet cheek, your precious mind at rest for the day.
  • Lilly waking up after a couple hours asleep, and, even though she loves her daddy so dearly, it's ME she wants. All mama. And when I come in to hold her, she is instantly comforted, and we sit in the dark and rock in the glider. As a bonus, she pats mama on the shoulder as she softly says, "Need drink (dink)." It's almost as if she knows I need this as much as she does.
  • I say to myself, "Rebekah, remember this."
6. Ian's alphabet
For some reason, little 'a' often wants to go the direction of little 'n' in Ian's name. So, now, scandalously, little 'a' tries to kiss big 'I' every time Ian writes his name. So of course, she goes toward 'I' instead of away from it. Seems to be working.


Since the local school system uses D'Nealian handwriting, I was excited to find this site. For my in town friends, check it out if you have a child about to start kindergarten. Click on "First Alphabet" on the left side and it provides D'Nealian worksheets and letter practice ideas.

Speaking of, parents of preschoolers, check out this article. Let's make sure our kids still play, okay?

Working on an annual freelance editing project right now--takes up lots of my fun time. It will be over soon and I will start feeding Yeebird again, daily.

Happy day, everyone.

Thursday, July 16, 2009

Summer. Make it Last.


Pineapple Whip tonight. Summer goodness. Make it last.

And a mini-layout/whatever-ya-wanna-call-it I made for the Moxie It's All Green to Me challenge. Bonus: today I discovered it matches this color challenge, too. If you've never checked out kwernerdesigns, you're in for quite a treat! It's a pretty place.

So, there ya have it--two birds, one stone. Here it is:


The challenge was to use the green theme plus display typography in a unique way. I played in Photoshop today and figured out how to make my words look like an overlay. It's exciting to learn new ways to amp up my digital muscles.

Also fun? Taking care of Mother Earth. I get teased a lot by certain friends over my obsession with recycling (you know who you are, girls).

By the way, the top collage was done by Master Nathan. Looks like he was inspired by my Photoshop effects, eh?

Speaking of that top photo, maybe he was channeling his inner insect or bird instincts, but while we were enjoying our Pineapple Whip treats tonight, Nathan walked up to the window, thought it was open, reached in to get napkins, and -- ouch! Rammed his hand right into the closed window.

Red-faced, he returned to our table saying, "It's SO clean!!" Rest-assured, the teenage kid working at PW is still laughing . . .

Saturday, April 18, 2009


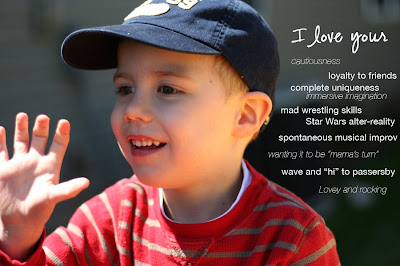
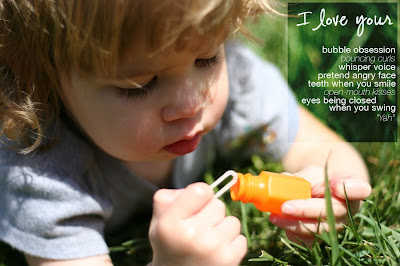
Cement memories by placing text directly on photos in Photoshop:

Text reads:
I love your
cautiousness
loyalty to friends
complete uniqueness
immersive imagination
mad wrestling skills
Star Wars alter-reality
spontaneous musical improv
wanting it to be "mama's turn"
wave and "hi" to passersby
Lovey and rocking

Text reads:
I love your
bubble obsession
bouncing curls
whisper voice
pretend angry face
teeth when you smile
open-mouth kisses
eyes being closed when you swing
"Yah"

So, here is my do-it-yourself weekend challenge to you: How about trying to crop an image and add text to your own photos in Photoshop? Following are step-by-step instructions to get you started. I have these instructions in a word document, along with screen shots of each step. If you are interested just post a comment with your email address and I'll send.

By the way, for those of you who told me you have tried to post comments on my site, I may have fixed the problem. Please try again. Thank you!

Here goes:

Select a picture and open in Photoshop.

CROPPING AN IMAGE

1. Determine exact dimensions (in inches) of the final cropped image.

2. Select the Crop Tool.

3. In the tool options bar (top of the Photoshop window, immediately below menu options), enter the width (in inches), height (in inches), and resolution (300 pixels/inch).

About resolution: default resolution (pixels per inch) is 72 for most .jpg camera images. This is fine for printing photos without text. If the resolution remains 72 ppi and text is added, the image on screen will appear fine; however, when printed, the text will be pixilated. Any time you wish to print an image with text on it, change the resolution to 300 ppi. This is standard ‘print’ resolution.

4. With the Crop Tool still selected, click on the image and drag the crop box as desired. The dimensions of the crop box are locked to the width and height you specified, so once you release the mouse, you can click and drag any of the crop box corners to adjust as needed.

5. With the crop box still active (non-cropped area is darkened), you can also click inside the crop box and move the desired crop area wherever you like.

6. When you’ve determined the exact crop area, press “Return.” The image will be cropped.

ADDING TEXT TO AN IMAGE

1. Select the Text Tool.

2. Click anywhere on the image, and type to see how the text displays. You’ll need to adjust it.

3. To move and begin adjusting text, select the Move Tool.

4. Using the Character and Paragraph palettes, change any attributes of the text you like (font, size, color, justification, line spacing, etc.). If these palettes are not visible by default, select Window>Character, and Window>Paragraph. This will display the palettes. Play with the different attributes until the text appears exactly as you like—have fun!

5. When you’re done, you’ll need to consider whether or not you may want to edit the text on this specific image at a later time. If so, you’ll need to save the file as a .psd (layered Photoshop document). This will preserve the text layers for editing as often as you like. If you don’t need to edit the text, click the options in the Layers palette, and select Flatten Image. This ‘merges’ the text with the image, making the text un-editable. Once the image is flattened, save as a .jpg file.

About file types: .jpg is the accepted file format for printing photos at most retail stores, and results in smaller file sizes capable of being emailed. .psd files are ‘working’ files and cannot be opened without Photoshop; additionally, they’re typically too big to email, but can be printed on a home printer.